How to Build an Off-Grid Solar System: The Definitive Guide
Written by qualified solar engineer Aniket. Last updated:
Table of Contents
Today, going off-grid is almost synonymous with going solar. And this is no surprise, given the impressive flexibility of solar power systems as well as the simplicity with which you can install them.
As long as you have the space, you can equip nearly any off-grid structure with solar. With the plethora of different component options readily available in the market, building an off-grid solar system is not so difficult – all you need is a little understanding of system design and some basic electrical know-how.
We will try to cover both of these in this article, so you can be one step closer to building your own off-grid, solar-powered system.
What You Need
Four main components go into building any solar power system:
1. Solar panels
Solar panels are the power-producing component of the system. They convert the energy in sunlight into electric current, hence the name “photo-voltaic”. Solar panels are available in two main types – polycrystalline and monocrystalline.
Polycrystalline panels are cheaper, but monocrystalline panels are more efficient. Monocrystalline is the recommended choice since the prices of solar panels have fallen significantly in recent years.
2. Inverter
Thanks to its similarity in function and importance, the inverter is often dubbed the heart of a solar system. An inverter converts the direct current (DC) coming from the panels into a more usable alternating current (AC) that most of your appliances need.
If you are running only DC loads, you may be able to set up a system without an inverter, but this severely limits your ability to run a variety of everyday household appliances.
When looking for an inverter, always look for one with a pure sine wave output for proper efficiency and reliability.
3. Batteries
Although solar systems can operate without batteries, it’s difficult to do so in an off-grid setting. Powering your loads at night or on very cloudy days becomes a challenge.
Batteries are chemical devices that are capable of storing electrical energy through chemical conversions happening inside of them. Batteries have evolved a lot, and today, the most advanced are lithium-ion batteries, which pack more energy capacity per unit volume.
4. Charge Controller
As the name suggests, this is an electrical component that controls the charge, or in other words, monitors the current flowing from the panels to the batteries for optimum charging and efficiency.
You can choose between PWM (Pulse Width Modulator) and MPPT (Maximum Power Point Tracker), but we recommend the latter for better efficiency.
Besides the above four major characters, the stage for a solar power system requires a bunch of supporting characters as well, also known as Balance of System (BOS), which includes:
- Solar Cables
- Breakers / Fuses
- DC Busbars / Fuse Box
- MC4 Connectors
- Cable Ties
- Metering Device
- Terminal lugs
- DIN rails
Lastly, you will need tools that will help you install the solar system:
- Wire Stripper
- Crimping Tool
- Plier
- Screwdriver
- MC4 Spanner
- Spanners
Now that we have everything we need, let’s jump on to the step-by-step process of designing and installing an off-grid solar power system.
Steps in Installing an Off-Grid Solar System
Designing and installing an off-grid system isn’t necessarily complicated, but it is complex, involving a more or less fixed sequence of steps.
1. Load Calculation and System Sizing
Before purchasing or installing the components, determine the specifications and quantities you need based on how much energy and continuous power you will be using.
There are two ways to calculate this. The slightly time-consuming way involves listing all your electrical appliances, their power consumption, and duration of use, as shown in the following example:
| Sr. No. | Appliance | Watts (Power) | Duration of Use (Hours) | Energy (Watts x hours) |
| 1 | Lights | 100 | 6 | 600 |
| 2 | TV | 200 | 4 | 800 |
| 3 | Water Pump | 400 | 1 | 400 |
| 4 | Refrigerator | 200 | 6 | 1200 |
| TOTAL | 900 W | 3000 Wh |
Based on how much energy you will use during the day and the night, you may need to store this entire 3000 Wh in a battery or a part of it. It is safer to assume you will store all of it in the batteries, meaning you need a battery with about 4800 Wh energy capacity.
As for the solar panel size, it depends on the location. Some areas receive up to 6 hours of full sunshine on average, while some receive only about 3. You can refer to one of the many sources on the internet for average sunshine hours in the USA.
Assuming you are in a region with four hours of average daily sunshine, you will need a total of 3000 Wh / 4 h = 750 W.
These basic calculations can provide you with a rough approximation for the size of solar panels and the battery required.
Alternatively, you can also use an online load calculator that allows you to calculate your load and system size in a few clicks, saving a significant amount of time and give you accurate numbers with sufficient reliability.
2. Installing the Batteries
As mentioned before, batteries come in various types and sizes. The best choice today is a lithium-ion system for better efficiency, safety, and lifespan.
Li-ion batteries come in more than one type – the Nickel-Manganese-Cobalt (NMC) chemistry is a pretty common type, but the more advanced Lithium Iron Phosphate (LFP) is rapidly gaining popularity due to its significantly longer life and safe operation.
Most batteries are rated 12V by default. Depending on your system voltage, you might need to connect the batteries in series or parallel. The input voltage of the inverter you choose to install governs your system voltage.
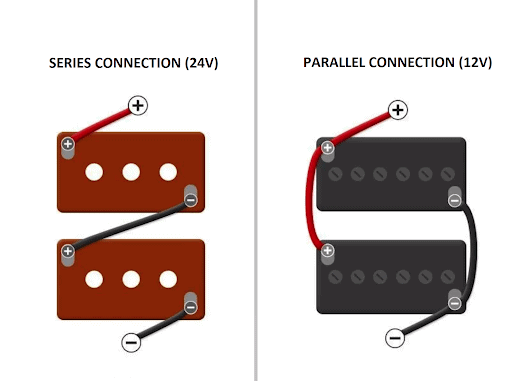
Series and Parallel Connection for batteries
3. Connecting the Charge Controller
A charge controller, as discussed before, is necessary to optimize the charging of batteries and protect the solar panels from reverse current. For the best results, we recommend choosing an MPPT charge controller.
Controllers come in 12V or 24V ratings, and you can choose the correct one based on your system (inverter) voltage.
As for the current rating, the device should handle the entire current coming from the solar panels and have a little safety margin. We can consider a safety margin of 30% in this case. You can thus calculate the current rating for the controller by a simple calculation:
Solar panel current rating x 1.3 = charge controller current rating
If the system rating of your solar panels is not known, use the following equation instead:
(Solar panel total watts/system voltage) x 1.3 = charge controller current rating
For example, if you have 600W solar panels and a 12V system, your charge controller rating will be 12V and
600/12 x 1.3 = 65 A
4. Installing the Inverter
Unless you are building a purely DC setup that runs only DC loads, you will need an inverter that converts the electricity coming from the solar panels or batteries into a usable form (AC).
Inverters come with a predefined voltage rating. Smaller sizes usually have a 12V or 24V rating. When setting up the entire system, select the solar panels, charge controller, and batteries so they configure to this rating.
As far as the wattage is concerned, select an inverter slightly larger than your calculated system size. For instance, a 1000W inverter is sufficient if your load calculation says you need an 800W system. Among the modern inverters available, we recommend choosing one with a pure sine wave output for the best efficiency.
5. Installing Your Solar Panels
Your load calculation gives you the solar panel rating required, and you have selected the batteries, controller, and inverter. The next step is choosing and installing the correct solar panels based on the voltage rating.
If your inverter input rating is 24V and your solar panels are 12V, you will need to connect two panels in series. If you need more than two panels, you can connect multiple pairs of two panels in series and then connect the pairs in parallel. For instance, if you are setting up an 800W 24V system and have four 200 W, 12V panels, you can connect two pairs in series and then both the pairs (technically called “strings”) in parallel.
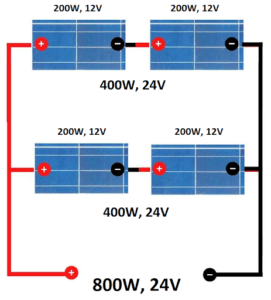
Solar panels connected in series and parallel
When installing the solar panels, make sure they face south (north if you are in the southern hemisphere). Also, ensure there is no shade on the panels during the day from neighboring trees or buildings.
6. Connect Everything Together
The final step is connecting the panels, batteries, and inverter to the charge controller’s terminals. Following is the wiring diagram for the connection:
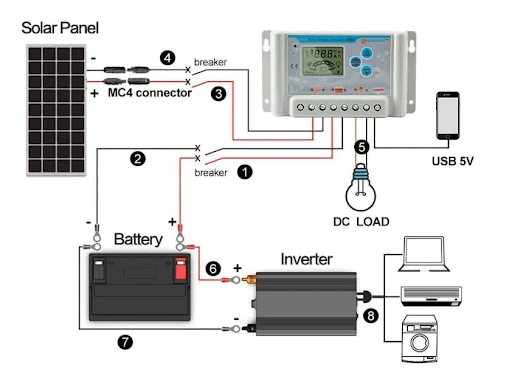
Off-grid solar power system wiring diagram (source – ZHC Solar)
While connecting components to one another, ensure that the polarity of the connecting wires is the same throughout (i.e. connect the positive terminals of one component to the positive of another and the same for negatives). It is good practice to use different colored wires for positive and negative, usually red and black respectively, to avoid mix-up.
When you finally connect the solar panels to the controller, cover the panels with a dark cloth so the sudden incoming current does not damage your other components.
Should You Build an Off-Grid Solar System from Scratch?
From the previous section, you can see building an off-grid system is not too difficult and involves only six steps. However, when installing the system, each of these six steps has a dozen sub-steps involved, and however general the procedure might sound, there is no one-size-fits-all approach to building a system.
Depending on factors specific to you, the installation procedure may require some frugality and last-moment innovation, which is not natural to everyone, especially those new to the world of DIY or even solar power.
Another important thing to consider is the availability of simpler options. While installing modern inverters, batteries, and charge controllers is a little easier than a decade or two ago, you can eliminate a lot of complexity by choosing ready-made complete solar power kits.
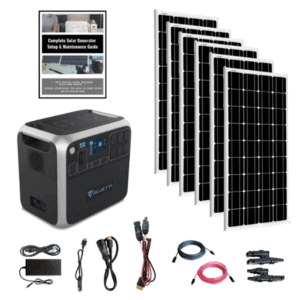
A typical, custom-built solar power system will include correctly sized panels, supporting hardware, and most importantly, solar generators that integrate the battery, charge controller, and inverter into one unit, massively simplifying the system.
For instance, you can choose a powerful kit that includes a Bluetti AC200P solar generator that boasts a top-of-the-line LFP battery and plenty of ports for easy connecting and disconnecting of loads and/or solar panels.
Bluetti AC200P Hex Kit
Conclusion
Sustainable, off-grid living is catching up fast, and there is hardly a better option for your off-grid energy needs than setting up a solar power system. Thanks to the incredible flexibility and noteworthy simplicity of solar equipment, building a DIY, the off-grid solar power system is a great idea and often an enjoyable experience.
By using four main components, doing a few basic calculations, and understanding the basics, you can build an off-grid solar unit.
On the other hand, technology has advanced at terrific speed. Building an off-grid solar power system might not be necessary, thanks to the availability of well-designed solar generators which combine three crucial components of a solar system into one device.
There are several complete solar kits on the market, impressively put together using the above-mentioned solar generators. If you want to seriously reduce or even eliminate the complexity and hassle of installing a full-fledged solar power system yourself, these solar kits can be a blessing for you!
We hope you liked this article. Please rate it or leave us a comment.
Average rating 4 / 5. Vote count: 1
No votes so far! Be the first to rate this post.

